Life & NotewinterTTr Blog2023-01-23T07:17:43.152Zhttp://winterttr.me/winterTTrHexo2023 中国新年http://winterttr.me/2023/01/23/Chinese-New-Year-2023/2023-01-23T15:09:00.000Z2023-01-23T07:17:43.152Z大家2023年,新春快乐
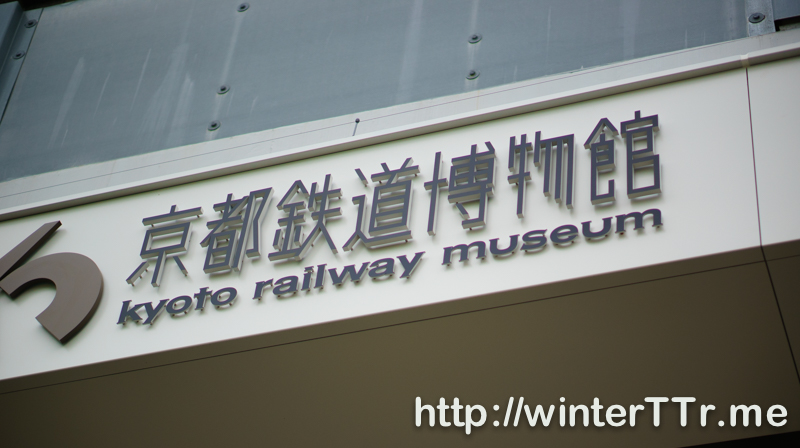
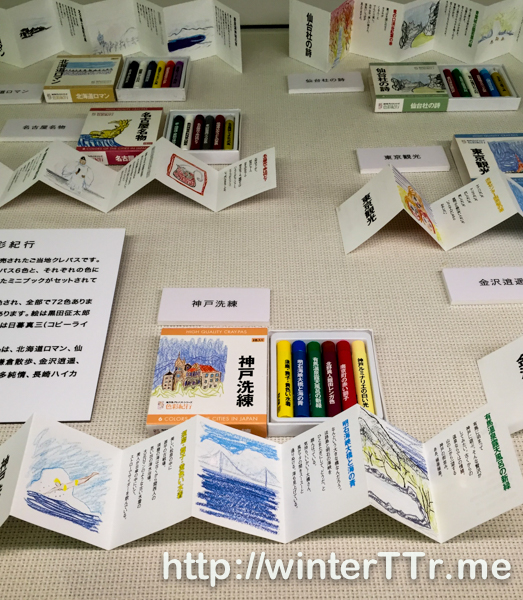
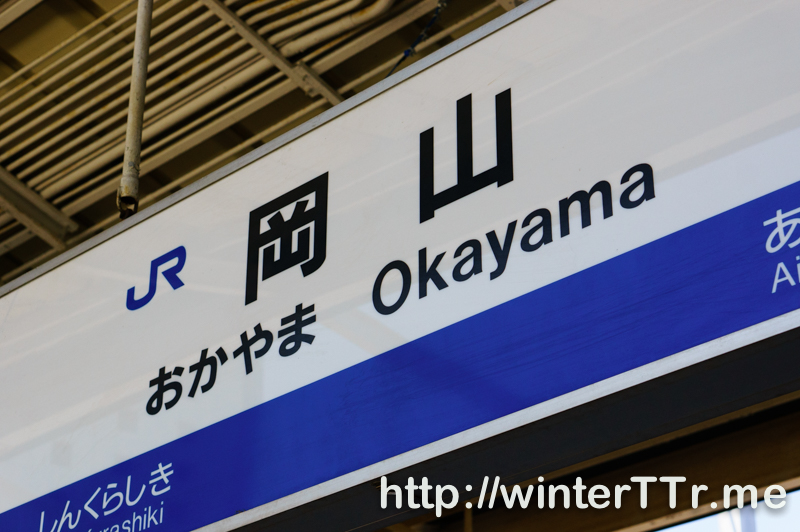
]]><p>大多数人到日本关西,基本上都是围绕京都,奈良,大阪等等的主要旅游地段。而这次虽然依旧是关西游,但主要是一些的围绕濑户内海北岸的各种城市的小众景点游玩。姫路(ひめじ),倉敷(くらしき),岡山(おかやま)等等,让人领略到了别样的日本关西。</p>
<p><img src="https://winterttrgithubio.blob.core.windows.net/images/2016-07-09-travel-japan-setonaikai-north/cover.jpg" alt="cover.jpg"></p>Claims Identity in ASP.NET authentication Middlewarehttp://winterttr.me/2015/12/12/Claim-Identity-In-AspNet-Authentication-Middleware/2015-12-12T21:10:14.000Z2023-01-23T07:17:43.152ZThe original motivation for this article is about following issue:
how does the claim identity information persist after login in ASP.NET
why does updating of claim identity in owin context not persist in further request
The WIF(Windows Identity Foundation) provides a Claims-Based Identity Model. And in ASP.NET, we can already build a Claims-Aware ASP.NET Web Application. Especially, when using with different kind of authentication middleware, WIF provides the same abstract layer to access the identity information across the whole asp.net pipeline context.
In this article we will talk about some detail about asp.net authentication middleware based on the CookieAuthenticationMiddleware. At the end, let’s discuss more about persist claim in cookie across request.
Owin Middleware
Simple speaking, Owin pipeline is a link of middleware, and the request will dive into this link to the end(or short-circuited before end), and the response will pop up back though the pipeline middleware. When coming through the middleware, this gives opportunity to middleware to process and even short-circuit the whole process line.
This diagram is a very simple and straightforward explanation about the Owin Middleware. And authentication middleware if one kind of middleware that will give their effect to the request and response process.
using System.Threading.Tasks; namespaceMicrosoft.Owin { publicabstractclassOwinMiddleware { protectedOwinMiddleware(OwinMiddleware next) { Next = next; } protected OwinMiddleware Next { get; set; } publicabstract Task Invoke(IOwinContext context); } }
Here is the definition the OwinMiddleware, there is two key pieces in code:
next: reference to the next middleware in pipeline
Invoke abstract function: this is the how this middleware could perform on the owin conext. The usually pattern would be “Before action” + “next.Invoke()” + “after action”.
AuthenticationMiddleware
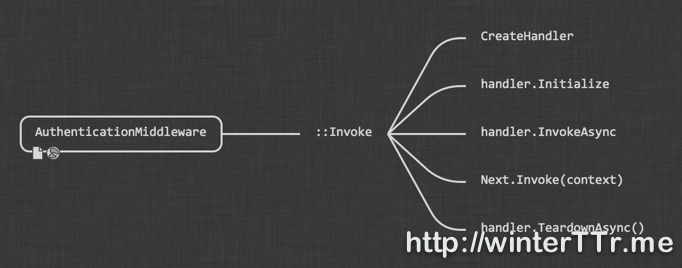
AuthenticationMiddleware is the base class for all authentication middleware. And it implement the basic pattern for the Invoke function for a concrete authentication middleware. Here is the flow:
So we can see that, the concrete authentication middleware will create an authentication handler and use that handler for further processing. The main logic for a authentication middleware is mainly about how the handler is implemented. So let’s see the peice of code for CreateHandler in CookieAuthenticationMiddleware:
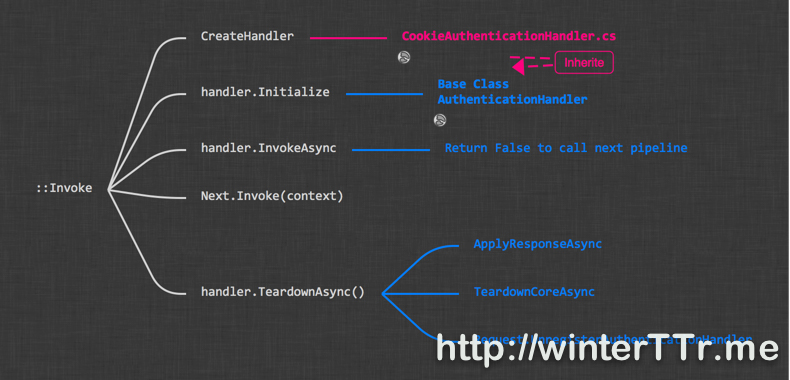
So the main logic of authentication middleware will be focus on authentication handler. Let see a deeper graph when we expand the AuthenticationHandler level:
The blue part will be the main part of how AuthenticationHandler works. And the red part will be how a specific authentication handler, here is CookieAuthenticationHandler implemented.
CookieAuthenticatonHandler
We do not have the plan to dive into every detail of how CookieAuthenticationHandler implemented. So we only focus to original issue, how claim identity does the persistence underlying.
In fact, originally, i thought the claim identity which we can access via User.Identity will be persist in cookie. So if I update the claims in User context, everything will be persist ( i mean update ) into the cookie later. So I can access the updated value in later request.
However, the thing is not as I wish.
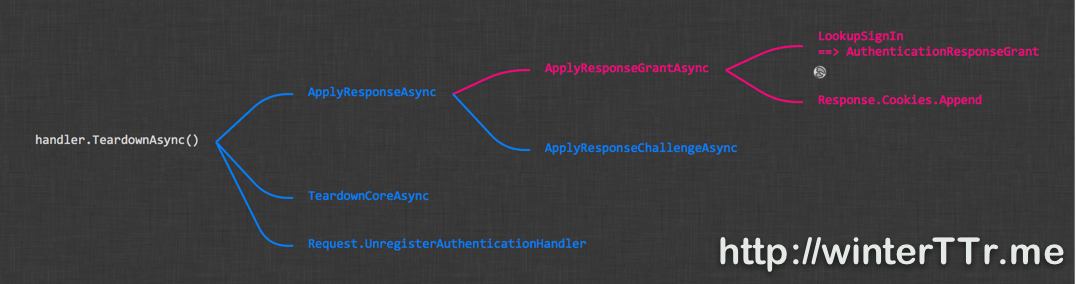
Here is the expanded version for CookieAuthenticationHandler:
The TeardownAsync will perform the persistence logic from the identity, but not like we wish. From the diagram, we found that findally, the CookieAuthenticationHandler use the ApplyResponseGrantAsync to save information. And what is Grant?
We can refer to more detail from the implementation:
public AuthenticationResponseGrant LookupSignIn(string authenticationType) { if (authenticationType == null) { thrownew ArgumentNullException("authenticationType"); }
AuthenticationResponseGrant grant = _context.Authentication.AuthenticationResponseGrant; if (grant == null) { returnnull; }
foreach (var claimsIdentity in grant.Principal.Identities) { if (string.Equals(authenticationType, claimsIdentity.AuthenticationType, StringComparison.Ordinal)) { returnnew AuthenticationResponseGrant(claimsIdentity, grant.Properties ?? new AuthenticationProperties()); } }
returnnull; }
So we finally found where the data comes from - Authentication.AuthenticationResponseGrant.
AuthenticationResponseGrant
Grant is the concept of the information that we retreive after we do the authentication. If the cookie handler save this grant into the cookie, we need to find where is grant come from.
if (properties != null) { // Update prior properties foreach (var propertiesPair in properties.Dictionary) { priorGrant.Properties.Dictionary[propertiesPair.Key] = propertiesPair.Value; } }
AuthenticationResponseGrant = new AuthenticationResponseGrant(new ClaimsPrincipal(mergedIdentities), priorGrant.Properties); } }
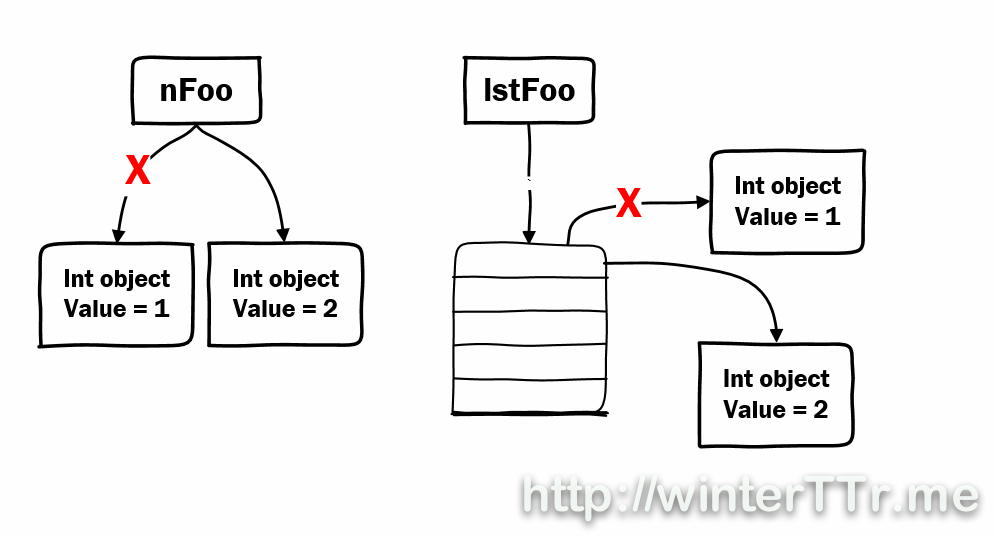
So in fact, this grant information is set when we call the SignIn function of the authenticaton manager. And if we do not call SignIn, the AuthenticationResponseGrant will be null. In that case, the cookie will not be updated.
And the User.Identity will NOT set to this authentication grant if SignIn is not called. That is why even update the User.Identity but those updated information will not take effect for any further request in asp.net.
After dive into such more detail from code level, let’s discuss about the original topic.
I found a solution here from the stackoverflow How to update a claim in ASP.NET Identity?, this solution will set the AuthenticationResponseGrant explicitly when try to update the claim items, this will trigger the sign in logic when Teardown is called.
In fact, this is one of the solution that indeed take effect. But it has a potential issue, that is, in fact, such kind of code will trigger the sign in logic underlying, and the sign in logic will update the cookie expiration time. This behavior works as you sigin in again when you explicitly set the AuthenticationResponseGrant. Of course, if the cookie expiration time is not a problem for your business logic, espeically when you use the SlidingExpiration, everyting should be fine.
But for my business which use the cookie authentication expiration as the web application login expiration. This will be a problem, and i should not use this way to update claim information in cookie.
So based on the implementation of Katana( i do not read the latest code, so correct me if i miss something), the identity saved in cookie is not designed for dynamically update. Those claim identity in the cookie is represented as a unique identity information that binding to a specific login and it should be immutable. And, updating the claim data in cookie with AuthenticationResponseGrant means to a totally new login instead of updating the current login context. So all the claim data that is persisted in the cookie should not be updated within a specific login session. So that is why we can found that most of the authenticaton middleware save the claim identity information belong to the login itself to the cookie.
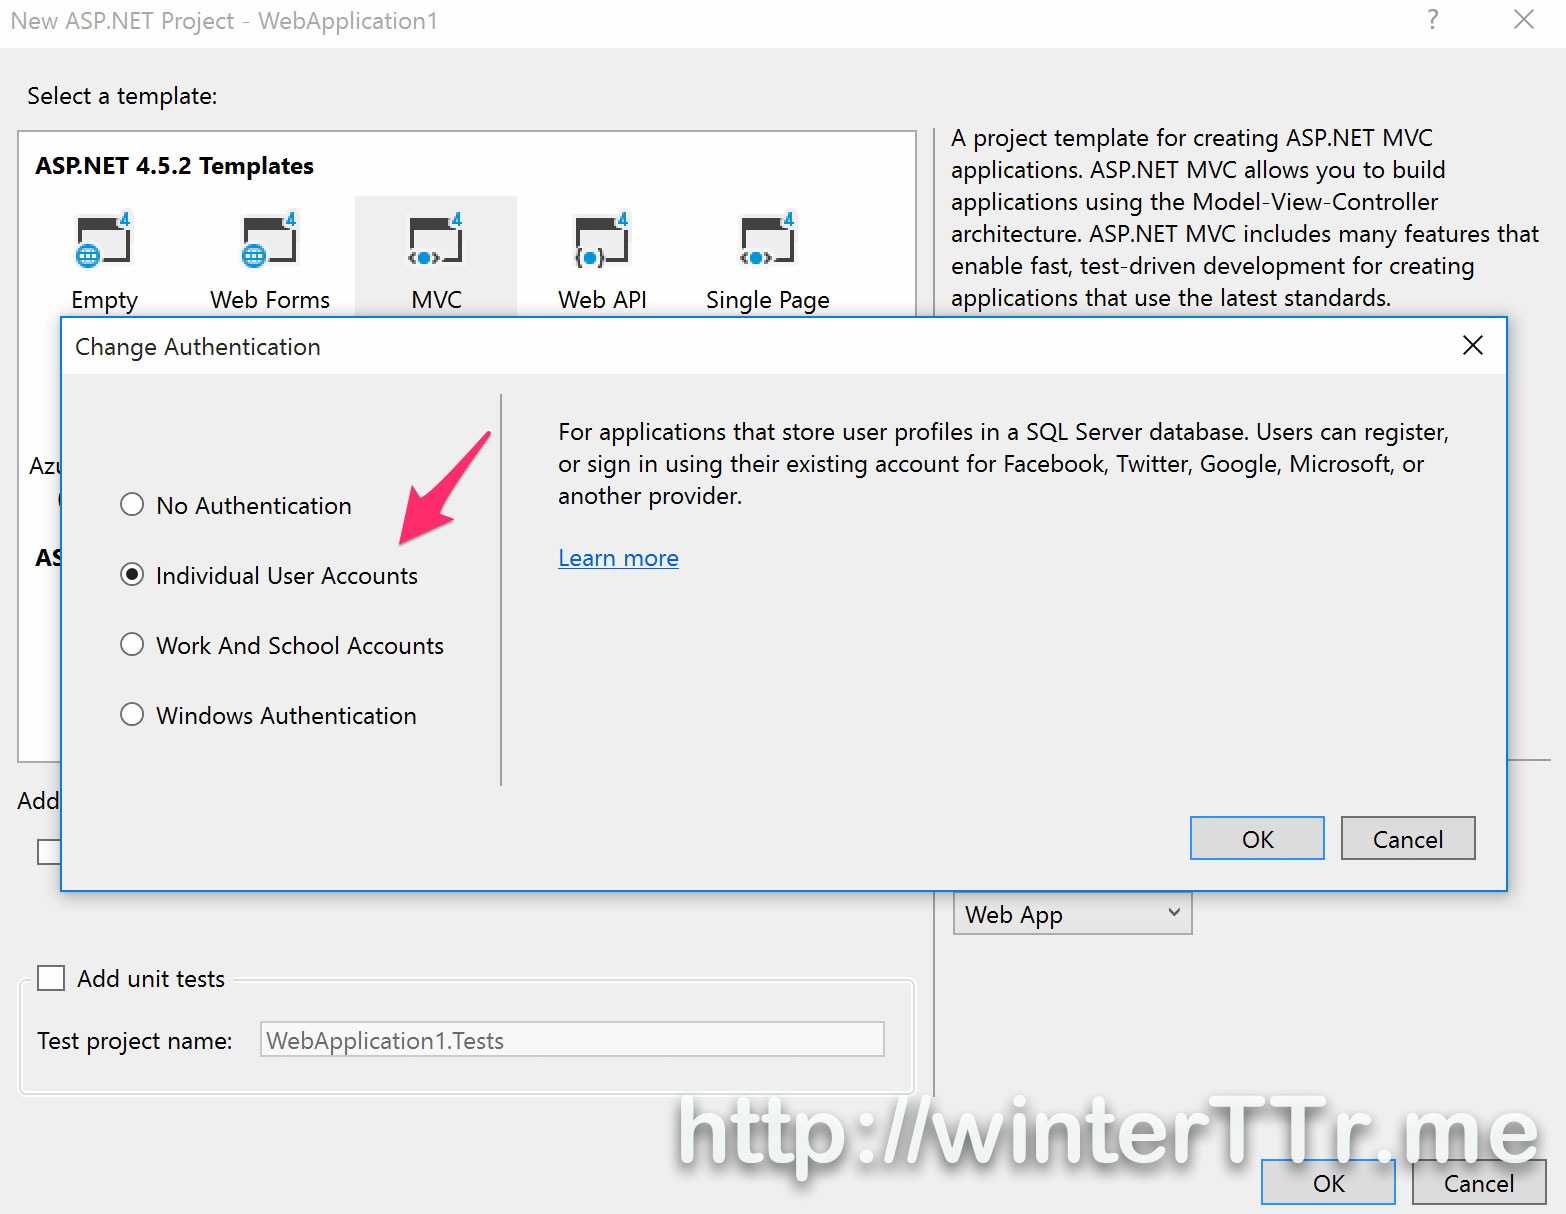
Yes, you may say that, how about those that do not belong to so-called “login information”, where should I save it? In fact, within asp.net project template the microsoft already provide us the way when you select “Individual Use Account”.
I do not want to dive more code here, the magic is ApplicationUserManager. This manager is using UserStore binding to a entityframework DbContext object. We can use the user manager’s AddClaimAsync|GetClaimAsync|RemoveClaimAsync to manipulate the claim data we want to save. The user manager will sync those saved claim everytime when the next query is comming, like what we wish. And yes, i think you already guess the conclusion, user manager is using the database to save the claim identity information underlying.
And one more option, if you just want to save some data between request, and those information is not a sensitive data, such as access code, you can use the Request.Cookie directly, and you can see those data from chrome debug panel under Resource tab directly. More simple, right?
Ok, claim identity in asp.net is so a big topic so i would talk more aspect on other article, let’s end here. Any question, please just reply and discuss with me :-)
]]><p>The original motivation for this article is about following issue:</p>
<ul>
<li>how does the claim identity information persist after login in ASP.NET</li>
<li>why does updating of claim identity in owin context not persist in further request</li>
</ul>
<p>The <code>WIF(Windows Identity Foundation)</code> provides a Claims-Based Identity Model. And in <code>ASP.NET</code>, we can already build a Claims-Aware ASP.NET Web Application. Especially, when using with different kind of authentication middleware, <code>WIF</code> provides the same abstract layer to access the identity information across the whole asp.net pipeline context.</p>
<p>In this article we will talk about some detail about asp.net authentication middleware based on the <code>CookieAuthenticationMiddleware</code>. At the end, let’s discuss more about persist claim in cookie across request.</p>无意中中了一枚transloader的兑换码http://winterttr.me/2015/11/28/Got-the-redeem-code-for-transloader/2015-11-28T21:25:52.000Z2023-01-23T07:17:43.152Z也不枉费我关注少数派这么久,哈哈 竟然中了一枚transloader的兑换码,奖不大但是心情很好~~ 顺便安利一下少数派,文章品质很不错~
]]><p>也不枉费我关注<a href="http://sspai/">少数派</a>这么久,哈哈<br>竟然中了一枚transloader的兑换码,奖不大但是心情很好~~<br>顺便安利一下少数派,文章品质很不错~</p>
<p><img src="https://winterttrgithubio.blob.core.windows.net/images/2015-11-28-Got-the-redeem-code-for-transloader/got_transloader_code.jpg" alt="got_transloader_code.jpg"></p>hexo cannot use space within tag plugin argumentshttp://winterttr.me/2015/11/07/hexo-cannot-use-space-within-tag-arguments/2015-11-07T10:44:06.000Z2023-01-23T07:17:43.152ZWhen I use the hexo tag plugin, i found that I cannot use space within the parameter of a tag plugin, even I wrap the parameter with double quote. This confuses me a lot.
Originally, I think this may be the bug of a 3rd party tag plugin for hexo. But after some investigation, this is the bug of hexo itself.
Nunjucks
Before I start to explain about the detail of this bug. I indeed speed several hours to dive into the code of Nunjucks.
Nunjucks A rich and powerful templating language for JavaScript.
Nunjucks is an interesting template framework for JavaScript. It has many great features and one of them used by hexo is the custom tag.
Nunjucks Custom Tag
In Nunjucks, you can define the custom tag to integrate it into whole lexical analytics system. So that it will be processed as a Nunjucks native supported tag.
In order to implement a custom tag, you need to implement two function:
parse
parse is used to get the travel through lexically-marked token. So that you will analyze each part of the arguments you want for your specific custom tag. For example, if you define a tag like below:
1
{% mytag "param1""param2""param3" %}
You need to define the parse function like:
1
function(parser, nodes, lexer)
You use the parser.nextToken() to get each part of your arguments.
For example (here is the pseudo code to explain, more info refer to lexer.js of Nunjucks:
Node -> { type: TOKEN_WHITESPACE, value: ‘ ‘ }
Node -> { type: TOKEN_STRING, value: ‘param1’ }
Node -> { type: TOKEN_WHITESPACE, value: ‘ ‘ }
Node -> { type: TOKEN_STRING, value: ‘param2’ }
Node -> { type: TOKEN_WHITESPACE, value: ‘ ‘ }
Node -> { type: TOKEN_STRING, value: ‘param3’ }
Node -> { type: TOKEN_BLOCK_END, value: ‘%}’ }
Usually, we travel through each of the lexical node, save them as specific node in nodes parameter back to Nunjucks framework, and found the TOKEN_BLOCK_END to stop our process for any custom tag
Run
Run is used to process the information you just analyze from the parse function. Simply speaking, it is used to render the parameters to its expected result for the case of hexo
Hexo implementation issue
Here is the pull request for fix the issue, i would like to talk based on it.
We can see that, current implementation of hexo:
simply connect all the parameter together as a string in parse function In fact, i do not understand here, it use a array args, but use the string += to connection all things together, which result in a string. Cannot make sure it is a expected code or the writer think he could use += for array elements.
simply split the string with space and ignore all the lexical context in run Hexo simply split all the parameter with space, this is the root cause for non space supported issue. And it pass the arguments into registered function. so we cannot use the space anymore even wrapped in a string literal.
One more detail about my change: If you want to use the Nunjucks to pass the result of parse correctly to run, you need to follow the internal structure of Nunjucks. Here my fix need to pass a array to run, instead of give the value of a nodes.Literal a simple javascript array object, we need to create a nodes.Array object, and add each of part of the tag arguments as nodes.Literal into it. so that Nunjucks can understand what we really want to pass.
So here i give a fix and hope hexo will merge it ASAP. In case anyone see the same issue, so I write it down here.
]]><p>When I use the hexo tag plugin, i found that I cannot use space within the parameter of a tag plugin, even I wrap the parameter with double quote. This confuses me a lot.</p>
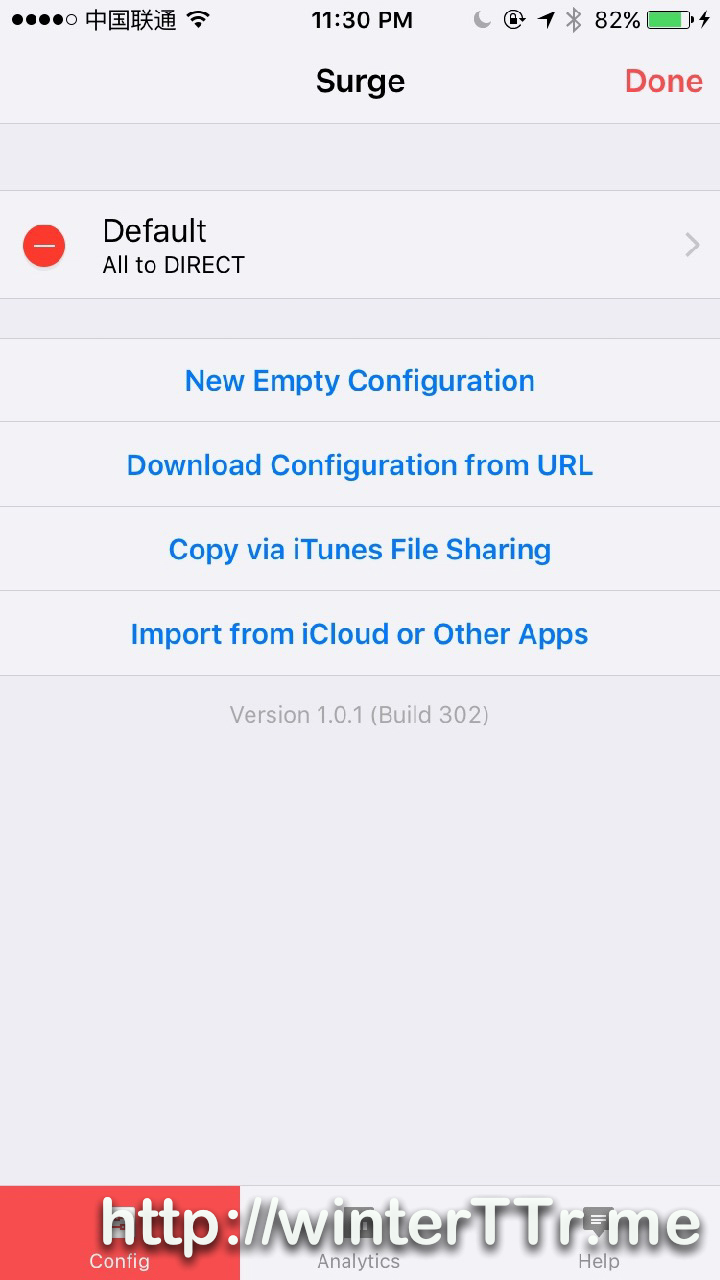
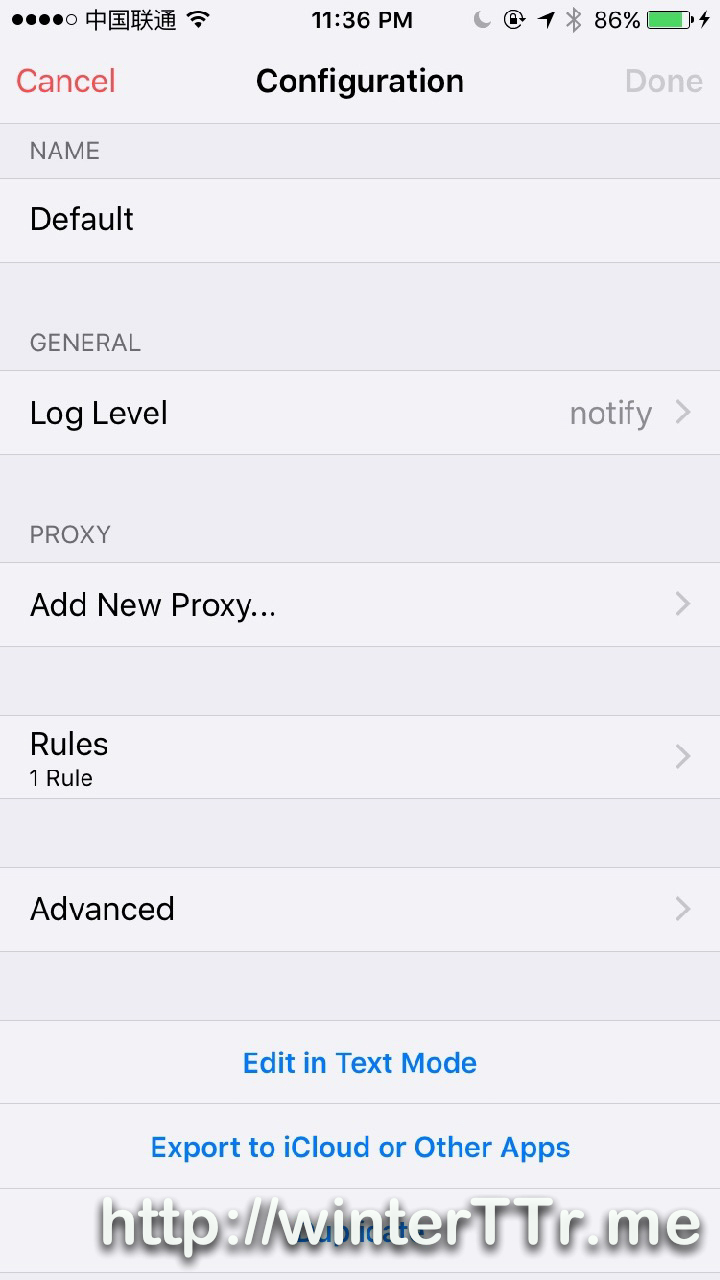
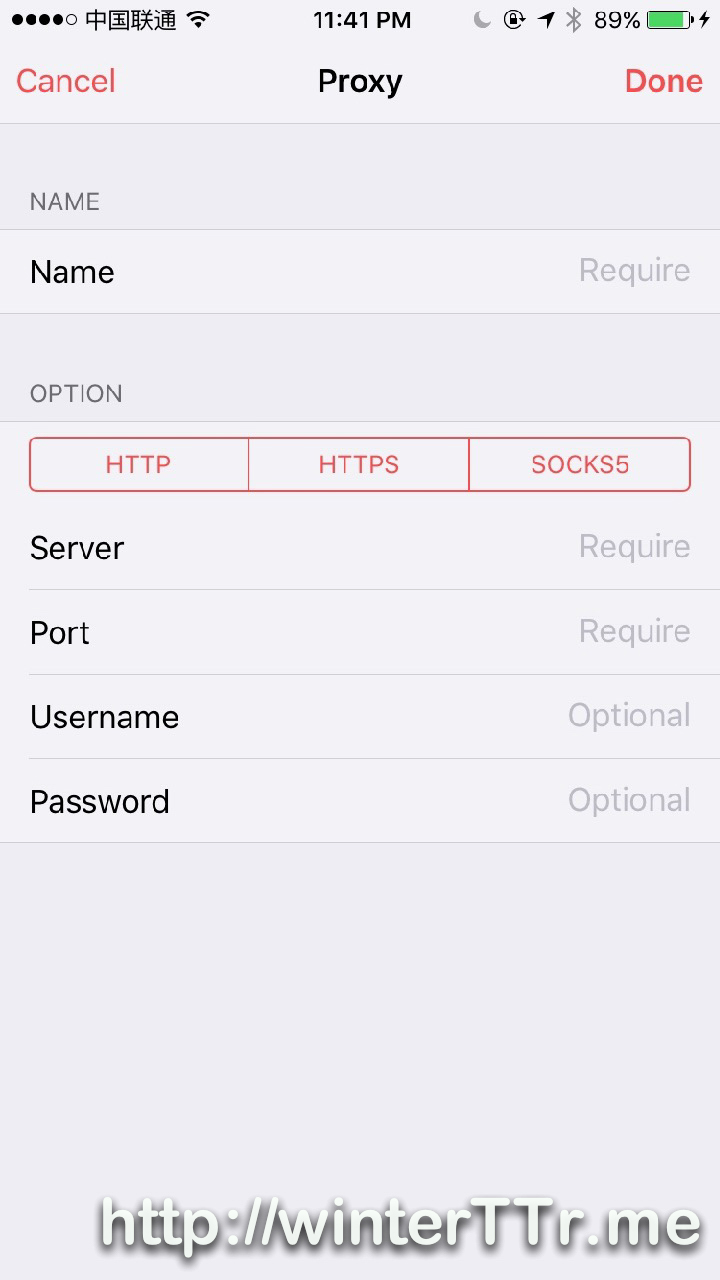
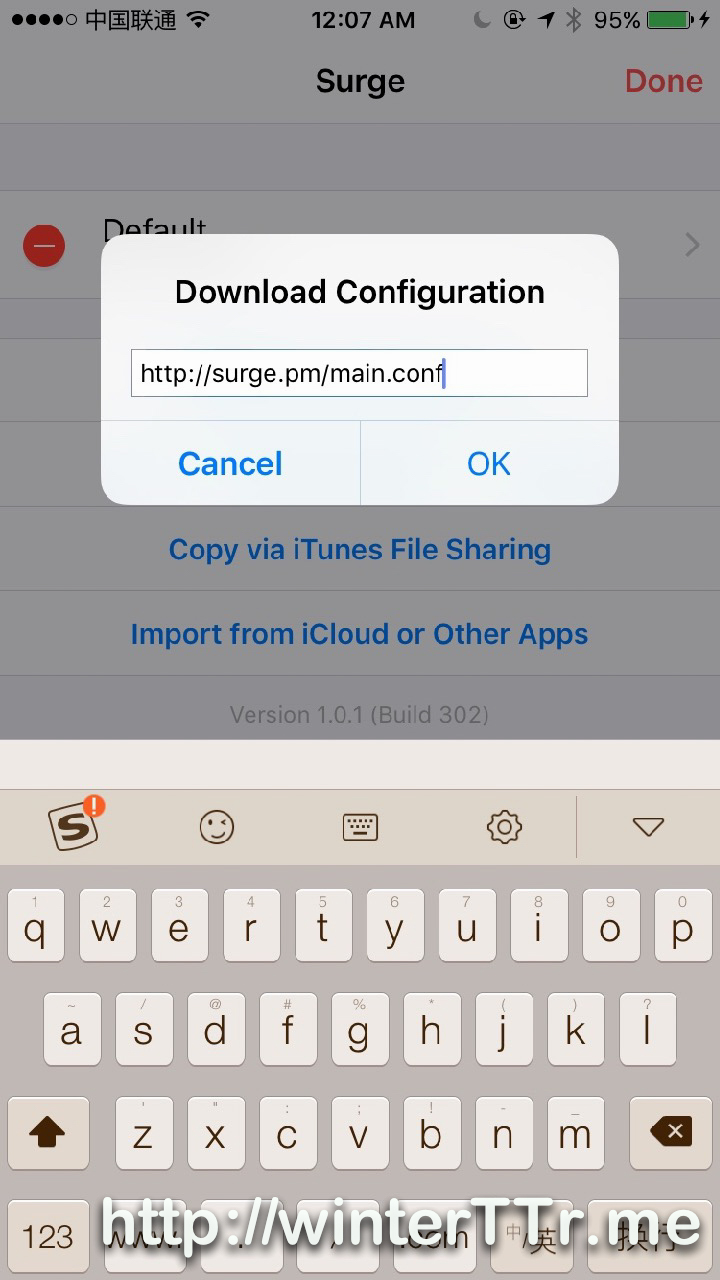
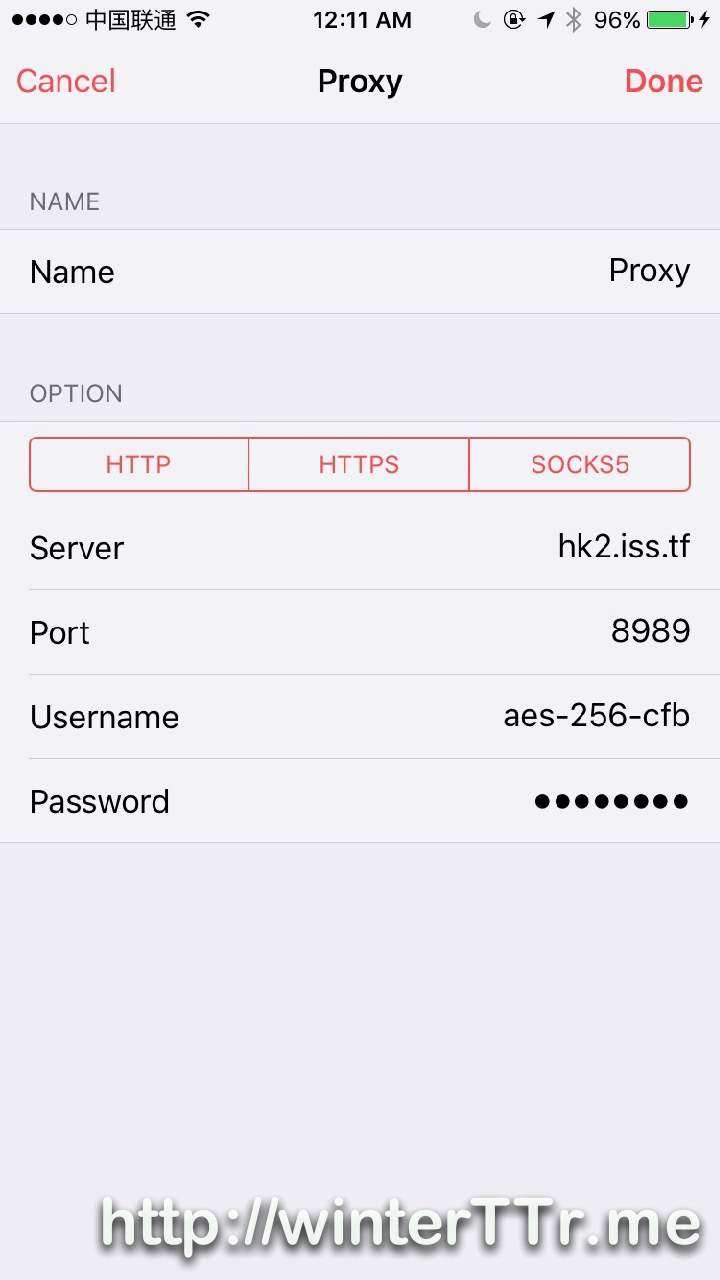
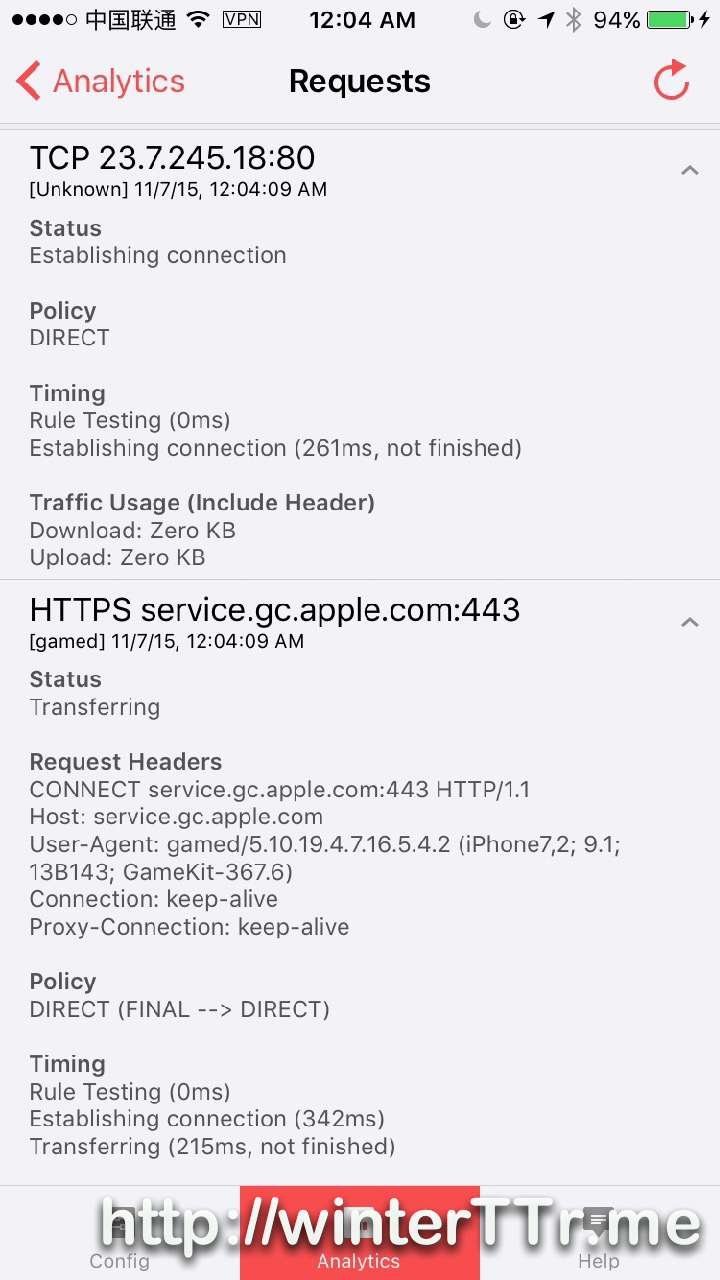
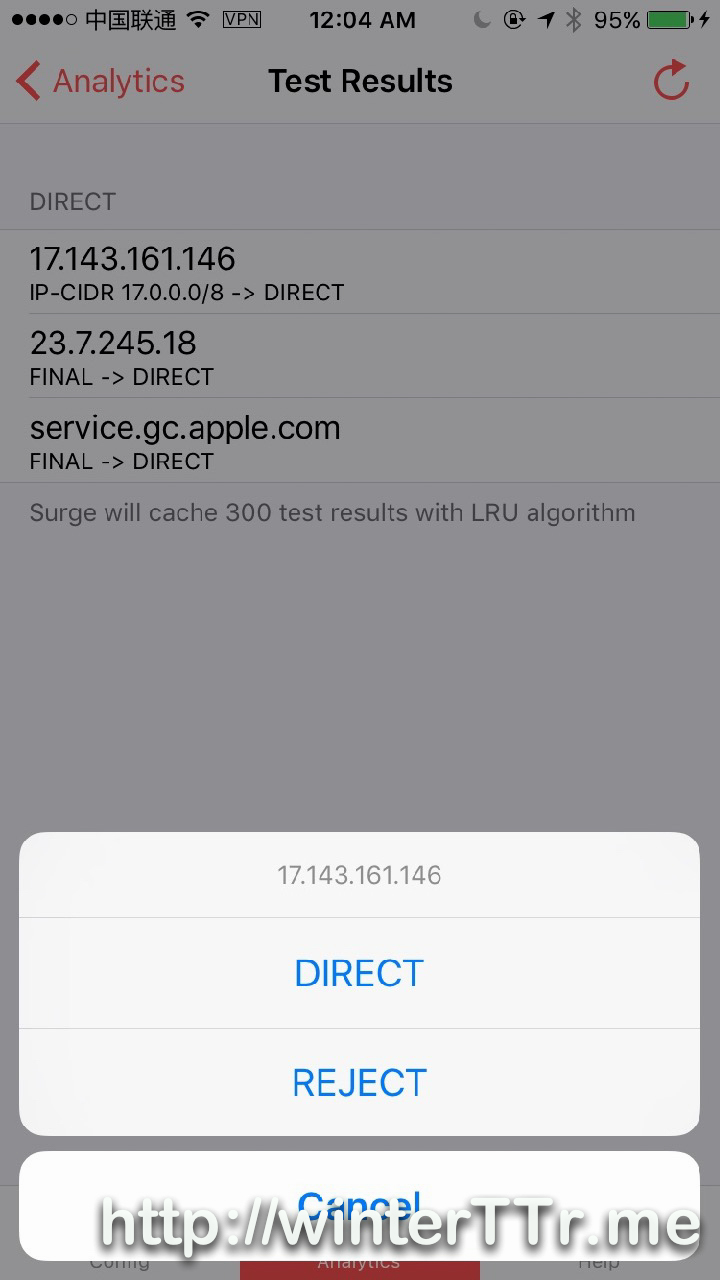
<p>Originally, I think this may be the bug of a 3rd party tag plugin for <code>hexo</code>.<br>But after some investigation, this is the bug of hexo itself.</p>在ios设备上使用surge配合shadowsocks开启网络全局代理http://winterttr.me/2015/11/04/using-surge-with-shadowsocks-under-ios-to-enable-global-network-proxy/2015-11-04T21:06:33.000Z2023-01-23T07:17:43.152Zios上的网络代理一直是我诟病的话题之一。
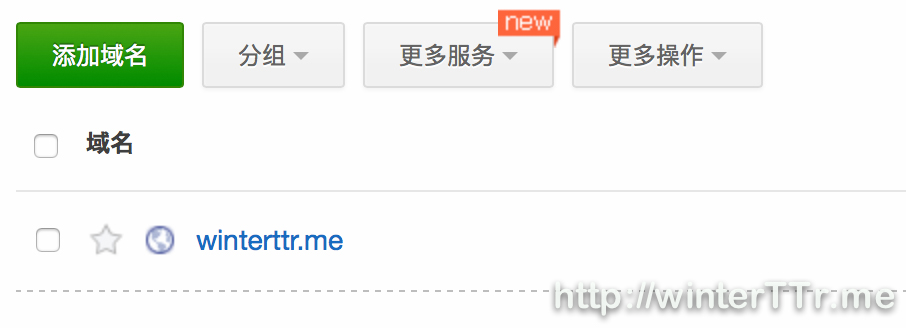
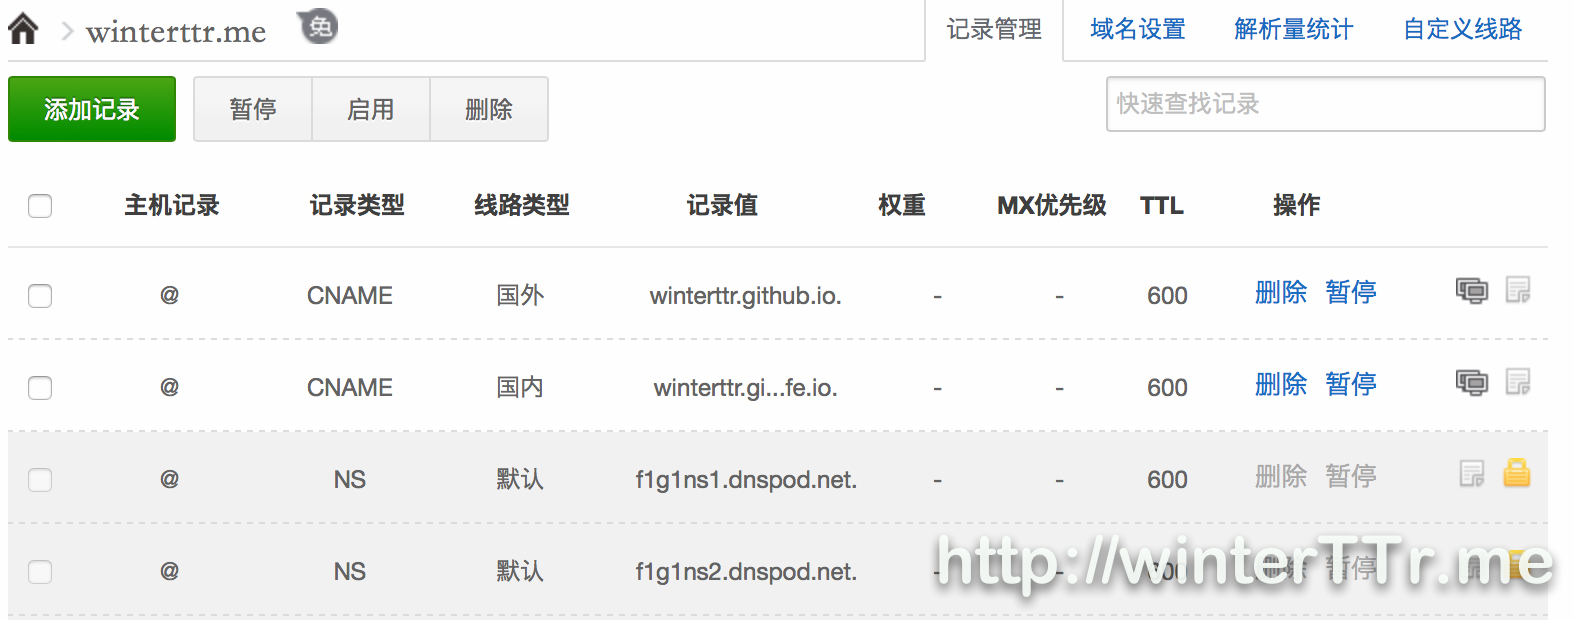
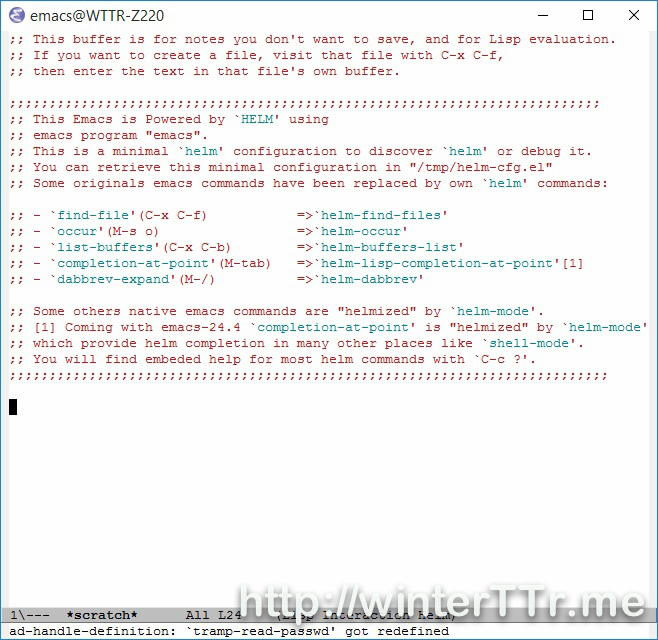
]]><p>当我们在github申请一个pages之后,很多人会选择自定义域名,给自己的github pages一个属于自己的名字。<br>那么,从申请到域名到最后的github自定义域名设置,中间究竟发生了什么,本文就来说说域名那些事。</p>emacs helmhttp://winterttr.me/2015/10/10/emacs-helm/2015-10-10T14:07:48.000Z2023-01-23T07:17:43.152ZHelm has been released a long time, but I am always get used to ido.
But based on some article recently, and I am really like new things, so I decided to use the this helm package.
So, let’s start.
Install Helm
Helm Github already tell many things about the install, here I want to memo down what I do.
I always use the subtree to manage the package by myself, so
The default behavior of Tab key is not handy enough, so change it:
1 2 3
(define-key helm-map (kbd"<tab>") 'helm-execute-persistent-action) ; rebind tab to run persistent action (define-key helm-map (kbd"C-i") 'helm-execute-persistent-action) ; make TAB works in terminal (define-key helm-map (kbd"C-z") 'helm-select-action) ; list actions using C-z
Some issue
Still, grep under windows, here is my solution, please not that, your grep under windows may not support --include well, so remove %e will fix it.
]]><p><code>Helm</code> has been released a long time, but I am always get used to <code>ido</code>.</p>
<p>But based on some article recently, and I am really like new things, so I decided to use the this <code>helm</code> package.</p>
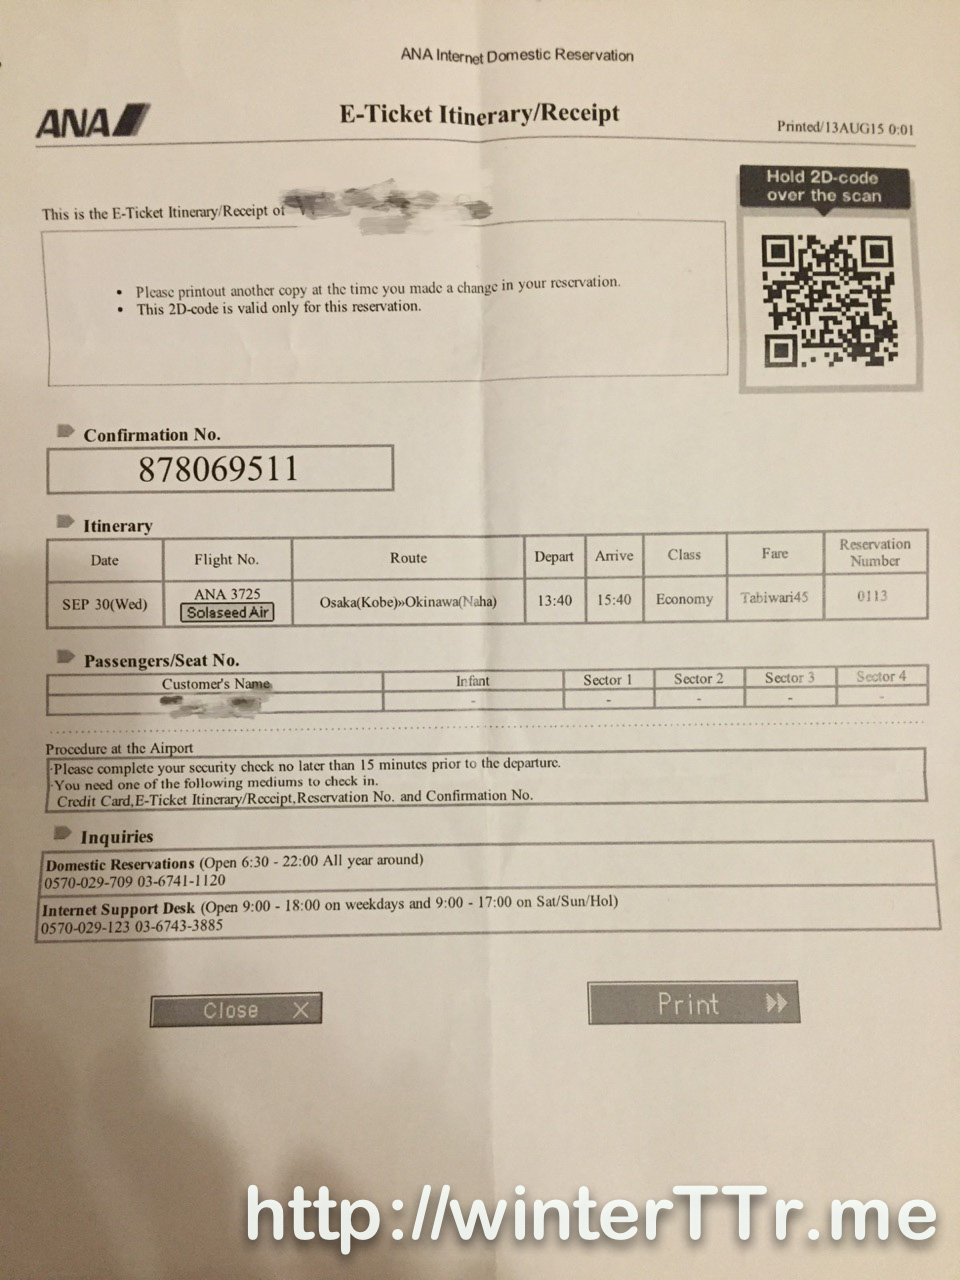
<p>So, let’s start.</p>三年签证之冲绳两日游http://winterttr.me/2015/10/07/3-year-visa-travel-to-okinawa/2015-10-07T16:07:17.000Z2023-01-23T07:17:43.152Z对于日本旅游来讲,大多数人是不会单独去冲绳旅行的。 而我这次是为了日本的三年签证,所以来了一次冲绳的短期旅行。 因为是只有两天时间的短期旅行,所以并没有进行冲绳的深度游,不能和很多的攻略大神比。 这里只是记录一下旅行中的小片段,和大家分享。
]]><p>对于日本旅游来讲,大多数人是不会单独去冲绳旅行的。<br>而我这次是为了日本的三年签证,所以来了一次冲绳的短期旅行。<br>因为是只有两天时间的短期旅行,所以并没有进行冲绳的深度游,不能和很多的攻略大神比。<br>这里只是记录一下旅行中的小片段,和大家分享。</p>emacs exec-path is not synced with $PATH under MacOShttp://winterttr.me/2015/09/12/emacs-exec-path-is-not-synced-with-PATH-under-MacOS/2015-09-12T16:33:16.000Z2023-01-23T07:17:43.152ZI do not notice this issue when I try to use the npm from emacs eshell. I found that the npm can be found from bash in iTerm2 but cannot be found from emacs eshell. Then I notice that the emacs do not sync the interal PATH with what you can check from bash.
I fact the wiki already mentioned those issues here. And also, you can find from the stackoverflow with the same question.
Here I want to tell a good package for emacs from stackoverflow: exec-path-from-shell
]]><p>I do not notice this issue when I try to use the <code>npm</code> from emacs eshell.<br>I found that the <code>npm</code> can be found from bash in <code>iTerm2</code> but cannot be found from emacs eshell.<br>Then I notice that the emacs do not sync the interal <code>PATH</code> with what you can check from <code>bash</code>.</p>git migrate from submodule to subtreehttp://winterttr.me/2015/09/08/git-migrate-from-submodule-to-subtree/2015-09-08T13:21:24.000Z2023-01-23T07:17:43.152ZMy emacs is mainly using git submodule to organise the packages. I do not use any package management for my emacs currently. But recently, i lose the evil package git repository access. That makes me to really the potential issue about git-submodule. Meanwhile, I found the git-subtree, so i decide to move all my packages from git-submodule to git-subtree.
Submodule vs Subtree
First, let’s talk about some differences between submodule and subtree.
submodule = main repository + SHA1 of sub repositories
When you clone you main repository, you have all you files in your main repository and the submodule record file .gitmoduless.
You need to use git submodule init to initialize the submodle configuration and git submodule update will check out the exact version of the sub repository from their remote git service. Of course, you can do all of these in one command, git clone --recursive (repository).
In fact, .gitmoduless only store the information of remote repositories, such as
So here is one of the potential issue for git-submodule, when you lose the access of other submodule remote git server or your remote server delete the commits with that SHA1 you want to reference, you cannot give your environment setup correctly again if you clone your main repository in new environment.
This is exact issue i met now.
subtree = main repository + snapshots of sub repositoies
When you clone your repository, you will get all the code no matter you main repository and sub repositoies. In fact, all the sub repository code will be commmitted to your main repository as normal files. So, this would be like a local snapshot of the sub repository. You clone your repository and you got all you should have for your whole environment.
Even though you cannot access some of the sub repository git service, you do not need to care about that because you already have the workable snapshot in your repository. The only case you need to access those remote service is when you need to pull their latest change and merge to your local snapshots, or you want to push your local change back to sub repositories remote git server.
This gives us several benifits:
you will not depends on other git service when you clone yourself. And the other contributors do not even need to know if there is a upstream repository existing.
you can make changes to your snapshot as if it is your code and you can track all the history.
And what git-subtree do is to help you check out this snapshots and merge upstream changes and etc.
So personally, I would consider git-subtree as a way to manage your sub repositories.
Detail Steps
Remove submodule
It’s a pity that we do not have a git submodule rm, so remove a submodule will be manual steps.
For a submodule, there are many places that record the relevant information, we need to clean them as expected to remove submodule gracefully:
.gitmodules Where your git folder and remote server is stored. Manually edit to remove submodule information.
.git/config After you do the git submodule init, git read the information from .gitmodules and save it here to track local submodule. You can use git submoudle deinit [submodule-path] to remove that module from this file. One thing need to pay attention to, if you use git module deinit, it will also remove submodule from working tree.
.git/modules/[submodule path] Here is where git fetch and save the remote sub module tree to. Need manually delete. If you do not delete it, it would report error when you want to add the same module as submodule again.
submodule file in working tree You can simply do this by rm -rf [submodule path]
So the steps are:
clean .gitmodules
Manually edit this file to remove relevant git submodule section > git add .gitmodules
clean .git/config
manually delete submodule section in .git/config
clean files in index/staged
git rm –cached [submodule path]
clean .git/modules/[submodule path]
> rm -rf .git/modules/[submodule path]
commit your change
> git commit -m “remove submodule xxxx”
clean local if necessary
> rm -rf [submodule path]
Here is my example:
~ $ ff .gitmodules
#<buffer .gitmodule>
~ $ git add .gitmodules ~ $ ff .git/config
#<buffer config>
~ $ git rm –cached .emacs.d/plugins/ace-jump-mode
rm '.emacs.d/plugins/ace-jump-mode'
~ $ git status
On branch masterYour branch is ahead of 'origin/master' by 1 commit. (use "git push" to publish your local commits)Changes to be committed: (use "git reset HEAD <file>..." to unstage) deleted: .emacs.d/plugins/ace-jump-mode modified: .gitmodules
If you want to use < in your markdown block, you need to escape it as <
]]><p>My emacs is mainly using <code>git submodule</code> to organise the packages. I do not use any package management for my emacs currently. But recently, i lose the <code>evil</code> package git repository access. That makes me to really the potential issue about <code>git-submodule</code>. Meanwhile, I found the <code>git-subtree</code>, so i decide to move all my packages from <code>git-submodule</code> to <code>git-subtree</code>.</p>Enable ASP.NET Web API detail error message in releasehttp://winterttr.me/2015/09/07/Enable-ASP-NET-Web-API-detail-error-message-in-release/2015-09-07T16:24:40.000Z2023-01-23T07:17:43.152ZAfter deploy the asp.net web api application, I found that when a error (exception) occurs, the return message would only be
1 2 3
{ "Message":"An error has occurred." }
But when in local debug, the message would be more detail:
1 2 3 4 5 6
{ "Message":"An error has occurred.", "ExceptionMessage":"The remote server returned an error: (409).....", "ExceptionType":"System.Net.WebException", "StackTrace":" at System.Net.HttpWebRequest.EndGetResponse(IAsyncResult asyncResult)...." }
Theoretically, you should not show those detail information to your final user, no matter for detail code security, or user experience. But when debugging our cloud service after deploying, we may need to figure out what happened in backend.
In fact, ASP.NET web api has a separate configuration for how the error detail is shown in different environments.
In your HttpConfiguration, there is a property called IncludeErrorDetailPolicy. Let’s check its possible value.
// Summary: // Specifies whether error details, such as exception messages and stack traces, // should be included in error messages. publicenum IncludeErrorDetailPolicy { // Summary: // Use the default behavior for the host environment. For ASP.NET hosting, use // the value from the customErrors element in the Web.config file. For self-hosting, // use the value System.Web.Http.IncludeErrorDetailPolicy.LocalOnly. Default = 0, // // Summary: // Only include error details when responding to a local request. LocalOnly = 1, // // Summary: // Always include error details. Always = 2, // // Summary: // Never include error details. Never = 3, }
Its comments has already show the detail, so for my case:
var config = new HttpConfiguration { IncludeErrorDetailPolicy = IncludeErrorDetailPolicy.Always // Add this line to enable detail mode in release }; WebApiConfig.Register(config); app.UseWebApi(config); } }
Done~~
]]><p>After deploy the asp.net web api application, I found that when a error (exception) occurs, the return message would only be</p>
<figure class="highlight json"><table><tr><td class="gutter"><pre><span class="line">1</span><br><span class="line">2</span><br><span class="line">3</span><br></pre></td><td class="code"><pre><span class="line"><span class="punctuation">{</span></span><br><span class="line"> <span class="attr">"Message"</span><span class="punctuation">:</span> <span class="string">"An error has occurred."</span></span><br><span class="line"><span class="punctuation">}</span></span><br></pre></td></tr></table></figure>
<p>But when in local debug, the message would be more detail:</p>
<figure class="highlight json"><table><tr><td class="gutter"><pre><span class="line">1</span><br><span class="line">2</span><br><span class="line">3</span><br><span class="line">4</span><br><span class="line">5</span><br><span class="line">6</span><br></pre></td><td class="code"><pre><span class="line"><span class="punctuation">{</span></span><br><span class="line"> <span class="attr">"Message"</span><span class="punctuation">:</span> <span class="string">"An error has occurred."</span><span class="punctuation">,</span></span><br><span class="line"> <span class="attr">"ExceptionMessage"</span><span class="punctuation">:</span> <span class="string">"The remote server returned an error: (409)....."</span><span class="punctuation">,</span></span><br><span class="line"> <span class="attr">"ExceptionType"</span><span class="punctuation">:</span> <span class="string">"System.Net.WebException"</span><span class="punctuation">,</span></span><br><span class="line"> <span class="attr">"StackTrace"</span><span class="punctuation">:</span> <span class="string">" at System.Net.HttpWebRequest.EndGetResponse(IAsyncResult asyncResult)...."</span></span><br><span class="line"><span class="punctuation">}</span></span><br></pre></td></tr></table></figure>Concurrent Reader on a specific EventHub Partition within one consumer grouphttp://winterttr.me/2015/09/05/Concurrent-Reader-on-a-specific-EventHub-Partition-within-one-consumer-group/2015-09-05T15:15:08.000Z2023-01-23T07:17:43.152ZWhen using Eventhub in Azure Service Bus, there is many things you need understand, I will talk something specific about about concurrent reader on consumer group.
The publish/subscribe mechanism of Event Hubs is enabled through consumer groups. A consumer group is a view (state, position, or offset) of an entire Event Hub. Consumer groups enable multiple consuming applications to each have a separate view of the event stream, and to read the stream independently at its own pace and with its own offsets. In a stream processing architecture, each downstream application equates to a consumer group. If you want to write event data to long-term storage, then that storage writer application is a consumer group. Complex event processing is performed by another, separate consumer group. You can only access partitions through a consumer group. There is always a default consumer group in an Event Hub, and you can create up to 20 consumer groups for a Standard tier Event Hub.
In order to consume events from an Event Hub, a consumer must connect to a partition. As mentioned previously, you always access partitions through a consumer group. As part of the partitioned consumer model, only a single reader should be active on a partition at any one time within a consumer group. It is common practice when connecting directly to partitions to use a leasing mechanism in order to coordinate reader connections to specific partitions. This way, it is possible for every partition in a consumer group to have only one active reader. Managing the position in the sequence for a reader is an important task that is achieved through checkpointing. This functionality is simplified by using the EventProcessorHost class for .NET clients. EventProcessorHost is an intelligent consumer agent and is described in the following section.
So based on the event hub documentation, we should only have ONE active reader( receiver ) on a partition within the same consumer group.
OK, you know, sometimes should does not means “must”. So let’s see another documentation from Azure Stream Analytics.
Each Stream Analytics job input should be configured to have its own event-hub consumer group. When a job contains self-join or multiple outputs, some input may be read by more than one reader, which causes the total number of readers in a single consumer group to exceed the event hub’s limit of 5 readers per consumer group. In this case, the query will need to be broken down into multiple queries and intermediate results routed through additional event hubs. Note that there is also a limit of 20 consumer groups per event hub. For details, see Event Hubs developer guide.
OK, here we see that, in fact, the limitation of total number of readers in a single consumer group on a specific partition is 5.
Let’s do some code test:
[TestMethod]public void Concurrent_Readers_On_1Partition_1ConsumerGroup() { var connectionString = CloudConfigurationManager.GetSetting("ServiceBus.Eventhub.ConnectionString"); const string eventhubPath = "eventhub"; var nsm = NamespaceManager.CreateFromConnectionString(connectionString); var description = nsm.CreateEventHubIfNotExists(eventhubPath); var builder = new ServiceBusConnectionStringBuilder(connectionString) { TransportType = TransportType.Amqp }; var factory = MessagingFactory.CreateFromConnectionString(builder.ToString()); var client = factory.CreateEventHubClient(eventhubPath); var partition = description.PartitionIds[0]; var group = client.GetDefaultConsumerGroup(); try { var receiverList = new List < EventHubReceiver > { group.CreateReceiver(partition), group.CreateReceiver(partition), group.CreateReceiver(partition), group.CreateReceiver(partition), group.CreateReceiver(partition), group.CreateReceiver(partition), // we create more than 5 first and comment this line to pass the test }; var taskFactory = new TaskFactory(); var task = ( from r in receiverList select taskFactory.StartNew( () = > { Task.Delay(TimeSpan.FromSeconds(1)); var msg = r.Receive(); var body = Encoding.UTF8.GetString(msg.GetBytes()); Trace.TraceInformation( String.Format( "Receiver{0}: {1} at offset {2}", receiverList.IndexOf(r), body, msg.Offset)); })).ToList(); Task.WaitAll(task.ToArray()); } catch (Exception e) { Trace.TraceInformation(e.Message); }}```First we create more than 5 reader one a specific partition: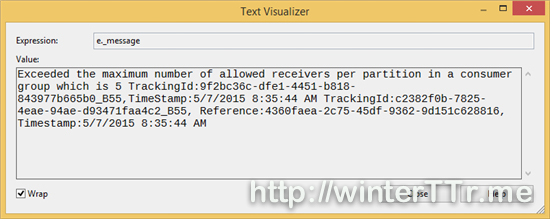We will received the above exception.After comments the 6th reader, and send some data to the event hub, I try to rerun the test again. Then we got the following result:> vstest.executionengine.x86.exe Information: 0 : Receiver1: { a : 16} at offset 0vstest.executionengine.x86.exe Information: 0 : Receiver0: { a : 16} at offset 0vstest.executionengine.x86.exe Information: 0 : Receiver2: { a : 16} at offset 0vstest.executionengine.x86.exe Information: 0 : Receiver3: { a : 16} at offset 0vstest.executionengine.x86.exe Information: 0 : Receiver4: { a : 16} at offset 0So we can see that, the result is obvious, we can see the five reader can work at the same time without competing.Hope they can give you some more idea when you try to read the data from even hub directly by yourself without using `EventProcessorHost`---
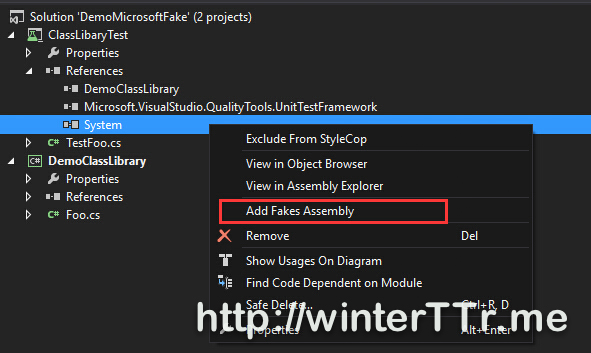
]]><p>When using <code>Eventhub</code> in <code>Azure Service Bus</code>, there is many things you need understand, I will talk something specific about about concurrent reader on consumer group.</p>C# Unit Test with Microsoft Fakeshttp://winterttr.me/2015/09/05/CSharp-Unit-Test-with-Microsoft-Fakes/2015-09-05T10:43:17.000Z2023-01-23T07:17:43.152ZIn common C# Unit test, we always meet the problem that our final application is depending on many 3rd party or system references. But for unit test, we need to separate and control the dependency libraries behaviour. One of the solution will be Microsoft Fake.
Here let me talk about Microsoft Fake , and how to unit test your application which depends on many system or other references.
Microsoft Fake
Microsoft Fakes is a test framework help you isolate the code you are testing by replacing other parts of the application. Microsoft Fake is highly integrated with Visual Studio and you can easily start to use it with very several clicks.
Fakes come in two flavours:
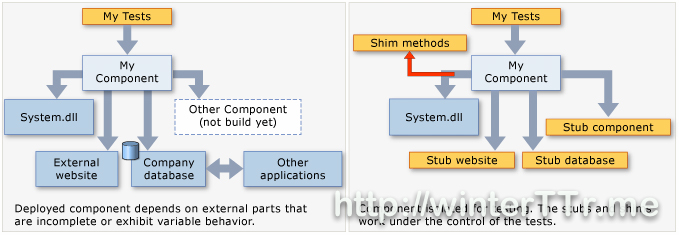
A shim modifies the compiled code of your application at run time so that instead of making a specified method call, it runs the shim code that your test provides. Shims can be used to replace calls to assemblies that you cannot modify, such .NET assemblies.
A stub replaces a class with a small substitute that implements the same interface. To use stubs, you have to design your application so that each component depends only on interfaces, and not on other components.
A good diagram to distinguish those two:
Comparison
Shim
Stub
Performance
Slow ( rewrite code )
As it is ( just interface implementation )
Static method, seal type
✔
✗
Internal Type with InternalsVisibleToAttribute
✔
✔
Private methods
✔ if all the types on the method signature are visible
✗
Interfaces and abstract methods
✗
✔
Using Shim
Here let we say that we want to test a function in a DemoClassLibrary.
We have a class that implements something depends on System library.
As the code show, the fake framework will add an extra code for your faked namespace (such as system in our demo), and all the extra code will under Fakes namespace. We can replace function calls under Fakes namespace to our test implementation expected. Every type will have a Shim+Typename under Fakes for us to replace.
** There is some kinds of different scenarios which we need to test using Shim, here I list some:**
Let’s say that we have a 3rd party library like this:
[TestMethod] publicvoidStubInterface() { var i = new StubIDependenceInterface() { InterfaceMethod = () => { return"my string"; } };
var foo = new Foo();
Assert.AreEqual( foo.UseInterface(i), "my string"); }
Compile warning issue
When you use fake the System library, you may see the compilation warning, that is because some type cannot be fakes, you can change the fake configuration file to fixit. The warning is like below:
Warning 20 Some fakes could not be generated. For complete details, set Diagnostic attribute of the Fakes element in this file to ‘true’ and rebuild the project.
Just shim or stub the things you really need, here is one of my example in real project:
]]><p>In common C# Unit test, we always meet the problem that our final application is depending on many 3rd party or system references. But for unit test, we need to separate and control the dependency libraries behaviour. One of the solution will be <code>Microsoft Fake</code>.</p>
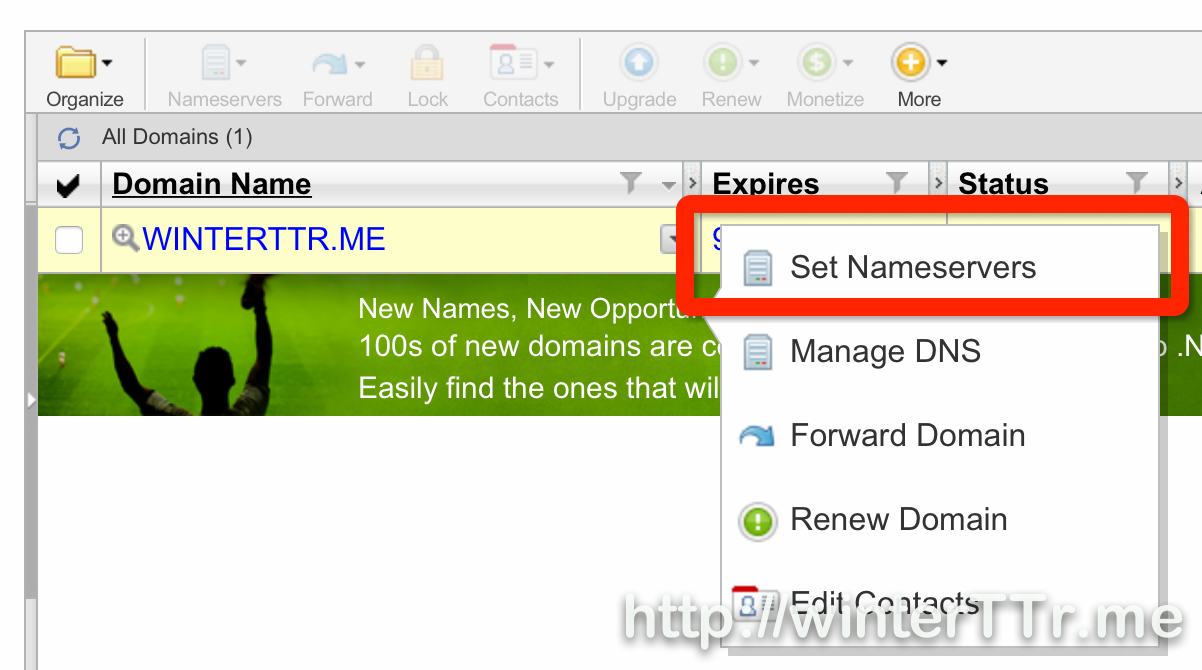
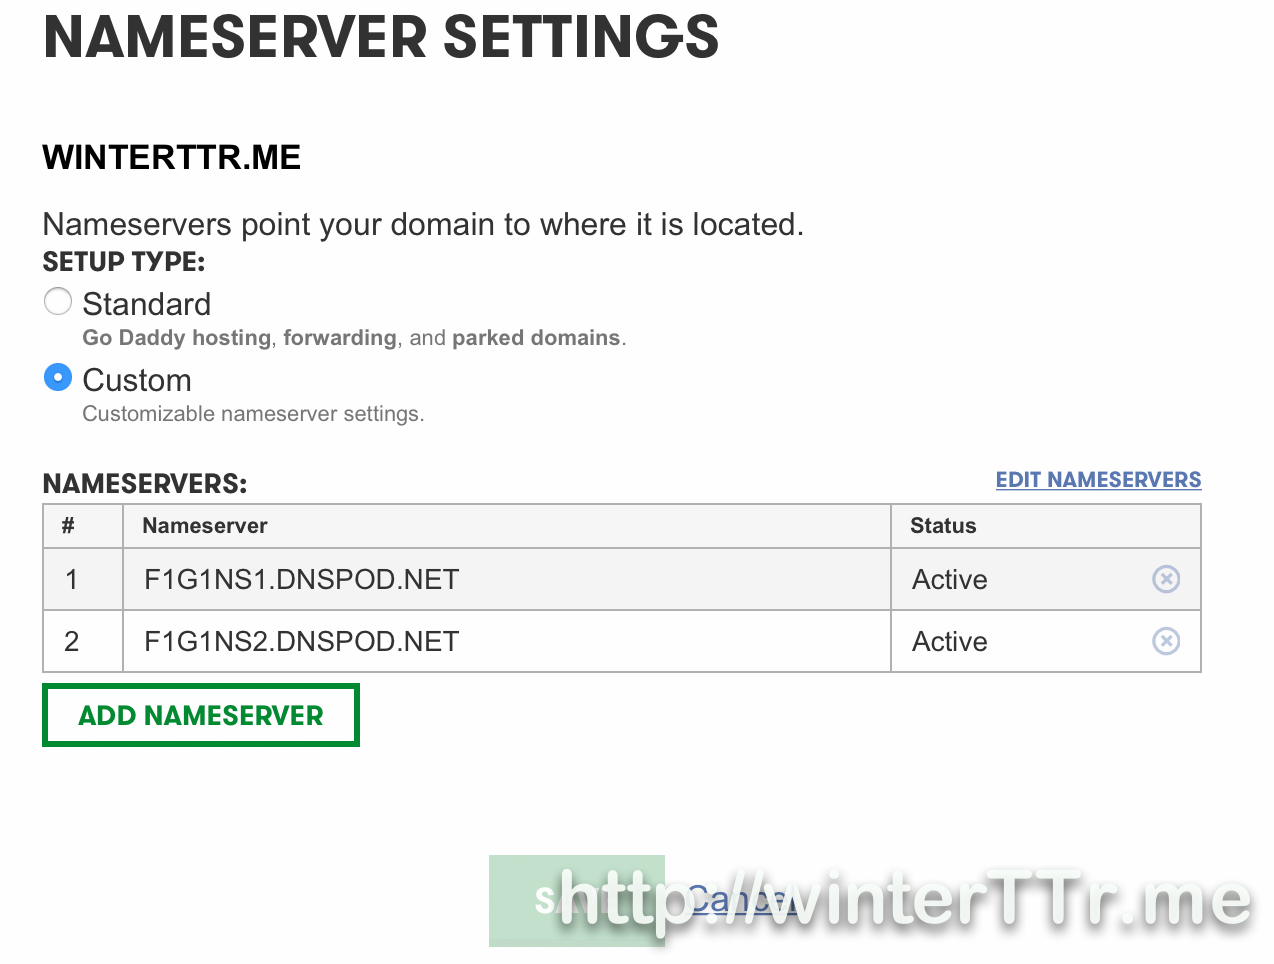
<p>Here let me talk about Microsoft Fake , and how to unit test your application which depends on many system or other references.</p>new domain winterTTr.mehttp://winterttr.me/2015/09/04/binding-new-domain/2015-09-04T17:22:32.000Z2023-01-23T07:17:43.148ZJust register a new domain name from godaddy, so this blog will use this new domain name as long as I can.
I have to say that the git hub page custom domain manual is really unclear. And thanks for that someone could give more detail.
]]><p>Just register a new domain name from <a href="http://godaddy.com/">godaddy</a>, so this blog will use this new domain name as long as I can.</p>
<p>I have to say that the <code>git hub page custom domain manual</code> is really unclear. And thanks for that someone could give more detail.</p>
<p>About how to setup godaddy, here is good <a href="http://andrewsturges.com/blog/jekyll/tutorial/2014/11/06/github-and-godaddy.html">reference article</a>.</p>
<p>Done~~</p>
<p><strong>Let’s blog~~!</strong></p>Common Hexo Workflowhttp://winterttr.me/2015/09/04/common-hexo-workflow/2015-09-04T12:30:35.000Z2023-01-23T07:17:43.148ZHere is the list of common hexo workflow commands.
Create draft
1
2
hexo new draft "your article name" emacs "your article name"
After this, the draft file will be created under source/_drafts folder without Date tag added.
Publish draft
1
hexo publish "your article name"
After this, the draft will will be move to source/_posts and the internal Date flag will be updated to the publish timestamp.
Test your post
1
2
hexo generate hexo server
Generate all the static blog file and start the local server.
You can simply do this via alias:
1
hexo g && hexo s
Publish to github page
1
2
hexo generate
hexo deploy
Of course you need to config the git in site _config.yml file. And the hexo will publish the result to github page.
Some memo
Manually set article digest after this line in your markdown file will be hidden from the homepage. <!--more-->
]]><p>Here is the list of common hexo workflow commands.</p>hexo + next donehttp://winterttr.me/2015/09/04/hexo-next-done/2015-09-04T10:52:19.000Z2023-01-23T07:17:43.148ZI think the hexo + next theme configuration should be almost done.
It takes 2 days for all the configuration and I have to say that this should be quick enough for a self build static blog.
Enable most of the feature for Next theme, which is really a good theme.
For all the configuration and environment, please refer to the hexo-content branch of the my github.
]]><p>I think the hexo + next theme configuration should be almost done.</p>
<p>It takes 2 days for all the configuration and I have to say that this should be quick enough for a self build static blog.</p>
<p>Enable most of the feature for Next theme, which is really a good theme.</p>
<p>For all the configuration and environment, please refer to the <a href="https://github.com/winterTTr/winterTTr.github.io/tree/hexo-content">hexo-content</a> branch of the <a href="https://github.com/winterTTr">my github</a>.</p>start againhttp://winterttr.me/2015/09/03/start-again/2015-09-03T16:23:52.000Z2023-01-23T07:17:43.148ZLet’s have a new start.
Before
It is a long time, I do not write something. In fact, there is always something that feels not very satisfied when writing down something new on web. Because I need to spend too much time on formatting things. Fonts, title, format, bullet and etc, I cannot focus on writing.
Now
Markdown is a really good choice now.
Meanwhile, hexo is really a good framework to start from scratch again.
Comparing with Jekyll and github page from raw, I think the hexo is better and more easy.
Here, I want to thanks to the Next theme for hex, it is really a well prepared theme and support many things which may need U to spend a lot of times to config. Thanks again.